
Your cart is currently empty!
Sugarworks Rules
Game Components
- 1 Game board
- 25 Candy tokens
- 5 Candy output tiles
- 30 Conveyor tiles
- 3 Shipping crates
- 1 Candy die
- 40 Order cards
- 5 Blanket order cards
- 5 Sugarworker cards
- 4 Bonk Helper cards
- 5 Candy activation sequence tokens
Game Overview
The conveyors keep sending completed candy along and you have orders to fill! Adjust the conveyors and align the candy to make the best of a bad situation as candy collides all over the Sugarworks. You and the other Sugarworkers manage the Sugarworks factory floor to get ahead of the candy!
Game Setup
You may use a modified set of components, especially for your first games, so adjust the steps below according to your scenario.
- The first player is the player who most recently ate candy.
- Set the candy die in front of this player.
- Place the board onto the table with the conveyors connecting.
- “A” side up for your first game!
- Place the candy output tiles on their starting locations, indicated by the small matching candy icon on the starting side of the conveyors.
- Place one corresponding candy on each of these output conveyors.
- Place the 3 shipping crates on their starting locations.
- Shuffle the stack of conveyor tiles.
- Deal 3 conveyor tiles to each player.
- Shuffle the order cards.
- Deal 3 to each player.
- Place the order cards next to the board in the designated spot.
- Reveal 4 order cards to create an order market.
- Shuffle and deal 3 blanket orders gray side up to an area all players can see clearly.
- Roll the candy die.
- Flip the corresponding blanket orders to the colorful candy side if they are one of the three in play.
Sequence of Play
- Player Actions
- Order Actions
- Factory Actions
- Candy Movement
Player Actions
Each player must take one Order Action and then one Factory Action.
Order Actions
First, take an Order Action. Choose one of the following:
- Pickup a face up order card
- Draw one from the top of the order card deck
- Discard one face up order card
Then discard down to five order cards in hand. Immediately replace any face up orders taken during this step. Then take a factory action. Order cards in the order market are incomplete.
Factory Actions
Take one of the following factory actions:
- Adjust an output to a new position
- Conveyors can be played from your hand
- Make a candy on an empty conveyor
After finishing a Factory Action, the next player clockwise takes their player actions. After all players have taken their player actions, the Candy Movement phase begins.
Adjust
Candy output tiles can be moved from their current space to an open space. Any candy on these tiles will move with them. There are only two spaces for candy output tiles in each row, so space will be tight!
Conveyors
When you take this action, you will play one of the three conveyor tiles in your hand. Then draw a conveyor tile.
You may place a conveyor tile in a space with an existing conveyor tile. Discard any conveyor tile in play and then play in that space.
You may place a conveyor tile in a space with candy. The candy will remain on the new conveyor tile.
Make a Candy
There is at least one candy icon on every order card. You can discard an incomplete order card to put a single depicted candy onto a single empty output conveyor.
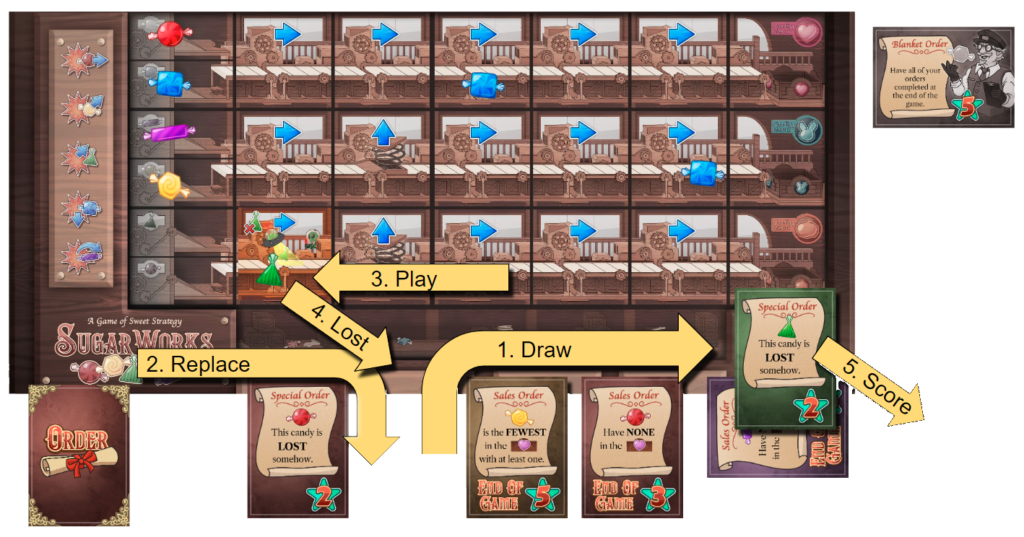
Player Actions Example
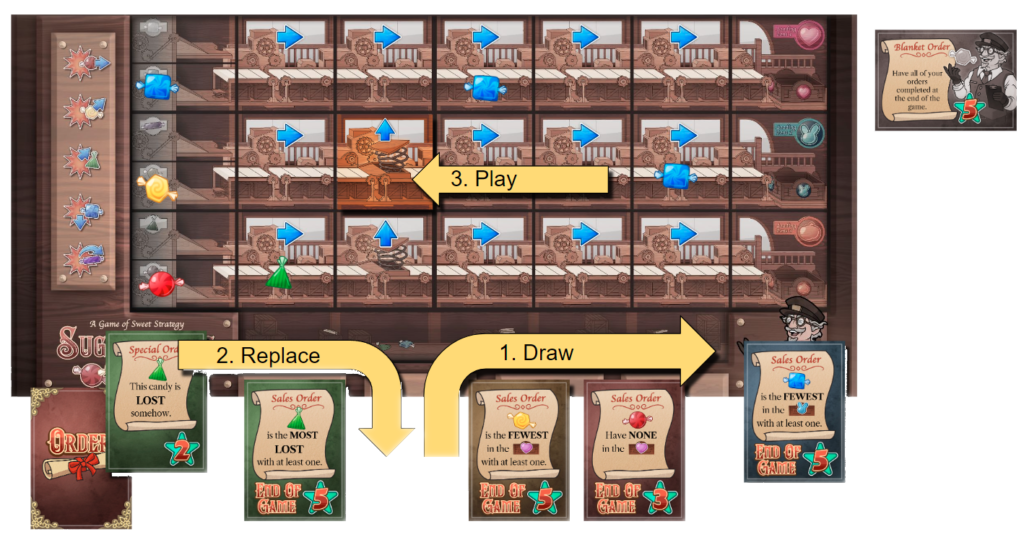
Alex begins their turn by taking a face up card from the order market and replenishing that order market space from the deck. Then, for their factory action, they take the conveyor action and play an Up spring in the middle conveyor line. They draw a replacement conveyor tile and the turn passes to the next player.
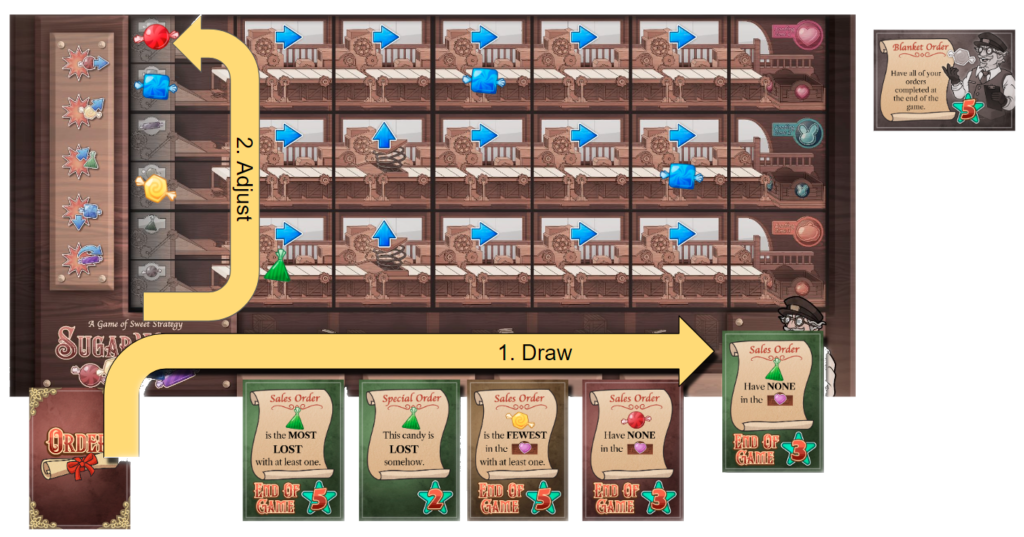
Blake doesn’t like the available orders and for their order action, draws the top card of the order deck, taking a chance at something better! For their factory action, Blake decides to adjust and move the red circle output conveyor to the empty space in the top row.
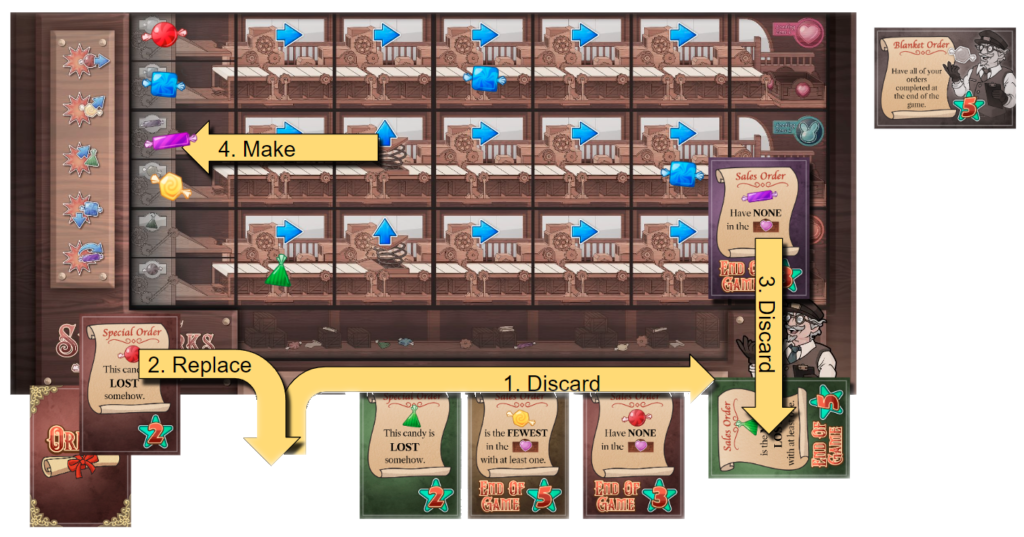
Casey has great orders in hand and might score well on the blanket orders, so they decide to discard a card from the order market row for their order action. For their factory action, they discard an order from their hand with a purple rectangle on it to make a candy. Casey places a purple rectangle candy on the empty purple rectangle output conveyor and is now scoring on the blanket order!
Dallas selects a face up card from the order market for their order action, they have a conveyor tile in hand and can score it right away! For their factory action, they take the conveyor action and place the green candy eater alien tile underneath the green triangle candy on the board. The green triangle candy is Lost right away, and Dallas can play their special order face up in front of them as soon as that candy is eaten. Those face up numbers near the star in the top right corner are points at the end of the game!
Candy Movement
After all players have completed their actions, the conveyors will activate, sending the candies toward their final destinations (hopefully!).
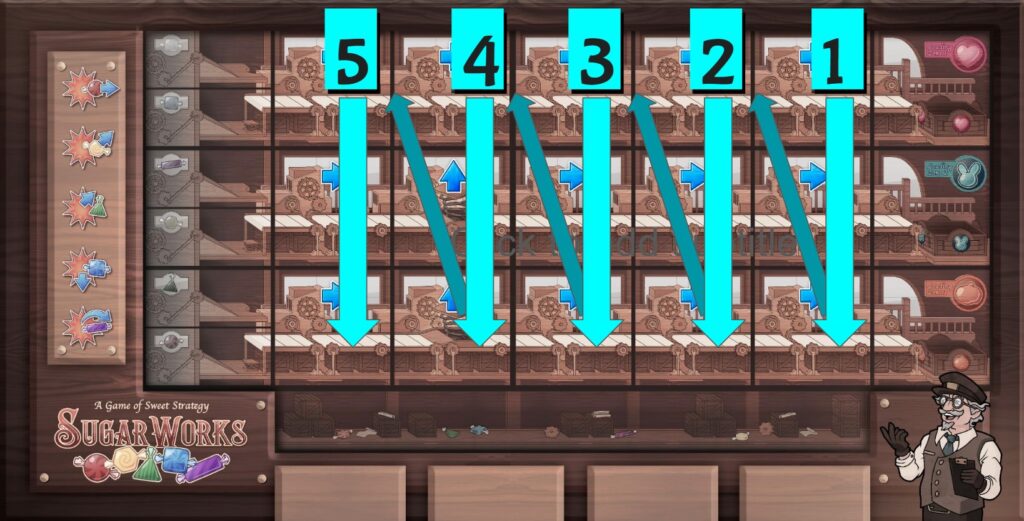
Candy will always be resolved in the following order of Candy Types:
- Red Circle
- Yellow Hexagon
- Green Triangle
- Blue Square
- Purple Rectangle
Disclaimer: Sugarworks is aware that a square is also technically a rectangle. We’ve included the color to ensure that there is no confusion.
The candy of that shape will always be resolved completely before moving onto the next shape. The top-right-most space is checked first, then resolve that column. The column to the left is resolved next starting at the top. One column at a time top to bottom, before moving on to the top of the column to the left.
Movement
During candy movement, the conveyor tiles cause the movement and follow the conveyor tile icons. The candy will activate twice, moving once space in the direction of the center icon on the conveyor tile that it is currently on each time.
If it moves into a space with another candy, you’ll resolve the Bonk! before the candy continues to activate if it has any activations left.

Lost
Anytime a candy leaves a board edge that doesn’t exactly place it into a shipping crate, the candy becomes lost. Move this candy to the X lost gutter on the game board. A candy tile with an X will cause candy or a specific candy to become lost.
Left Icon
If an icon appears in the upper left corner of the conveyor tile, this icon is resolved as soon as candy enters the tile, before a Bonk! Is resolved.
| Movement Icon Chart | ||
| Icon | Movement | |
 | Move the candy in the direction indicated by the arrow. | |
 | Move the candy to the right two spaces, skipping over the space immediately to the right.. | |
 | Move the candy to the left two spaces, skipping over the space immediately to the left. | |
| The candy shape shown becomes lost. | ||
Bonk!

When a collision happens you can reference the diagram on the helper card described here for each candy shape:
| Bonk! Chart | ||
| Candy Struck | Bonk! Movement | |
| Red Circle | The Red Circle that was hit moves one space to the right. | |
| Yellow Hexagon | The Yellow Hexagon moves diagonally up and to the right one space. | |
| Green Triangle | The striking candy moves diagonally up and to the right one space. | |
| Blue Square | The striking candy moves down one space. | |
| Purple Rectangle |  | The striking candy moves to the right one space. |
Note: Bonks! can result in a chain reaction of Bonks!
Once all Bonks! have been resolved, the initially moving candy will continue to move with any activations it had left, along the conveyor track.
Candy Movement Example
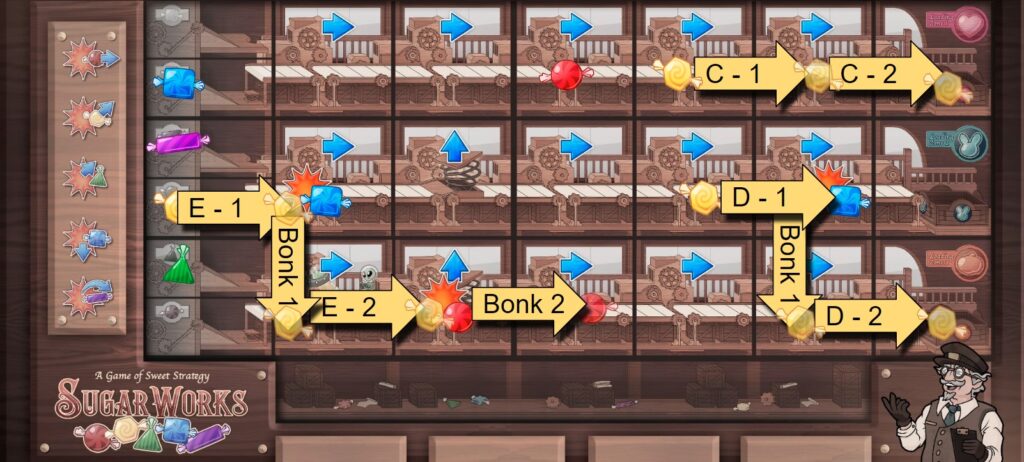
The red circle candy in the rightmost-topmost position activates twice before moving on to the next red circle candy.
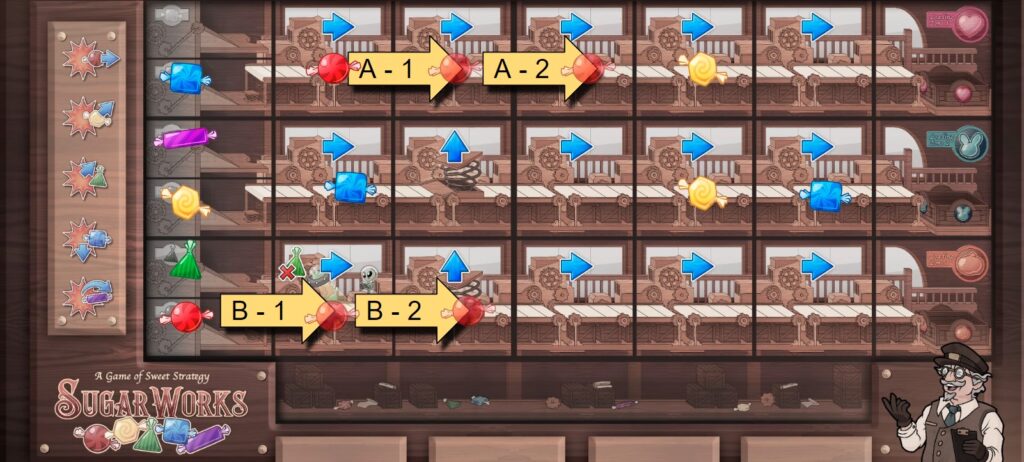
The rightmost-topmost yellow hexagon activates twice, and is loaded into the heart shipping crate. Then, the next rightmost in the middle row activates and Bonks! into the blue square candy. When the blue square is Bonked! the candy that moved into it goes down one space. The yellow hexagon activates again and is loaded into the pumpkin shipping crate. Then, the last yellow hexagon activates and Bonks! into the blue square sending the yellow hexagon down one space. The yellow hexagon activates a second time, Bonking! into the red circle. When the red circle is hit, the red circle moves one space to the right. Notice, the red circle ignores the conveyor direction! Bonks! always happen exactly as pictured in the helper!
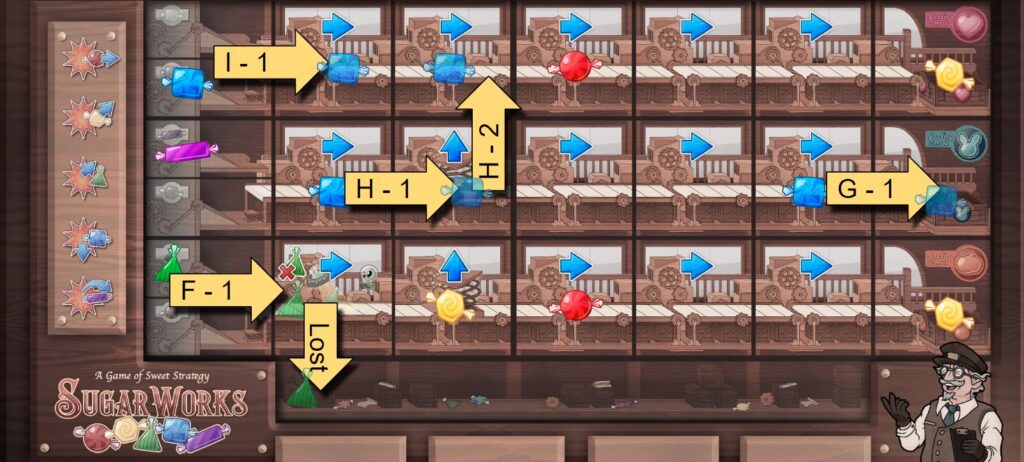
Green triangle will activate and immediately become lost as soon as it lands on the green candy eater. Blue square activates and goes into the bunny crate. The second blue square goes right one space and then up one space. The third blue square goes right one space and leaves the board looking like this before it activates a second time.
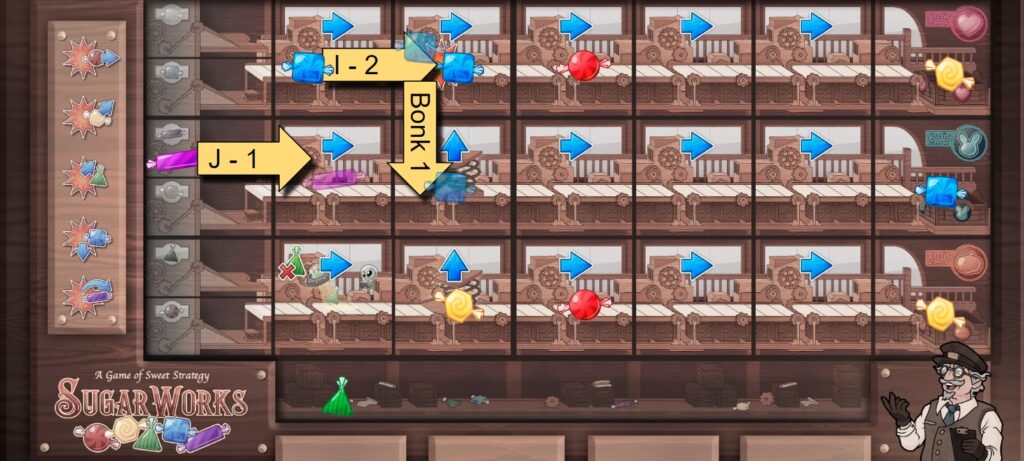
The second activation for the blue square candy Bonks! into the other blue, sending the moving blue square candy down one space. Then the purple rectangle activates the first time setting the board like this:
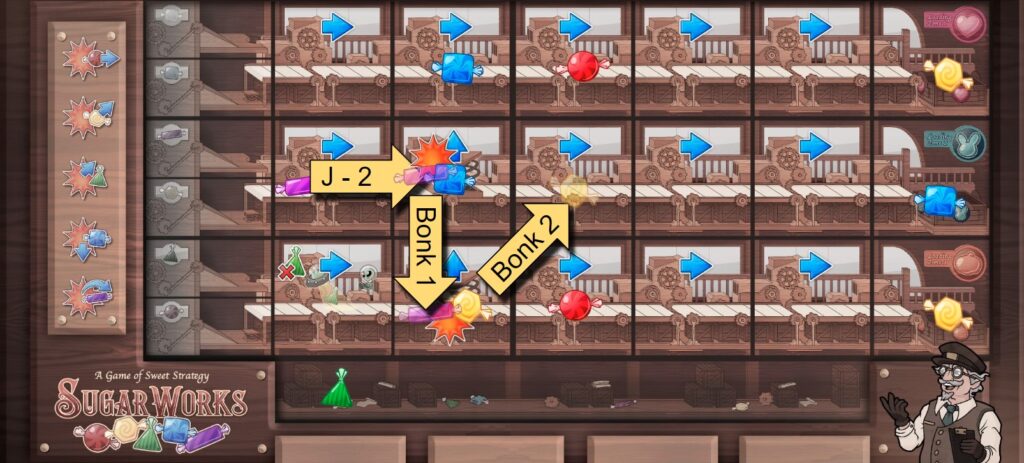
Lastly, the purple rectangle activates a second time, Bonks! into blue square sending purple rectangle down one space. There, it Bonks! a second time into yellow hexagon, which sends yellow hexagon up and to the right one space.
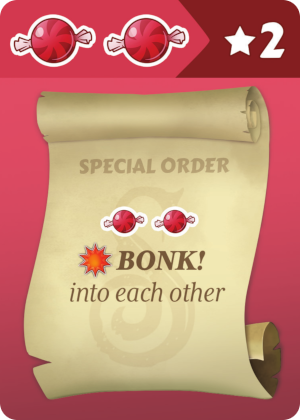
Special Orders
Special orders are played from your hand immediately once the triggering event occurs. Play these face up in front of you – they will score the points on top of the card at the end of the game. This is a great way to get cards out of your hand to make room for additional orders. In this example, two red circles must bonk into one another. This also counts as two red circle icons. Order cards in hand are incomplete until scored.
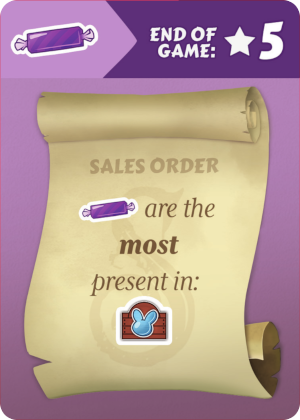
Sales Orders
Sales orders score at the end of the game as indicated in the lower left corner of the card. These cards will score if the condition on the card is true. In this example, if the purple rectangle has the most deposited in the bunny crate.
Blanket Orders
All players can score on these shared orders.
Blanket orders with two scores shown will award the highest value to the player(s) that have the most cards matching that scoring condition. Second place is awarded for all player(s) who tie for second place with the given criteria.
Candy Die
After all candy has completed their movements, pass the candy die to the next clockwise player, who becomes the first player for the next round.
The new first player rolls the candy die.
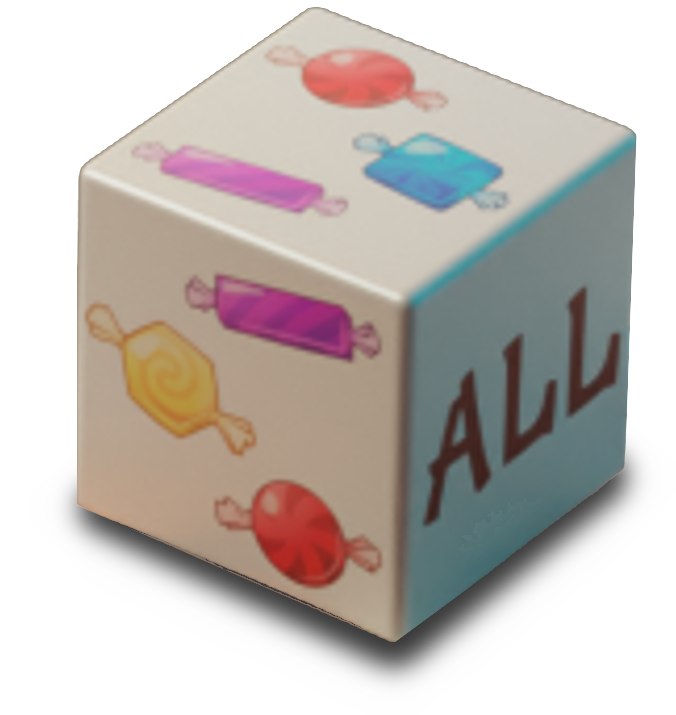
For each shape rolled, place one candy of that type on the corresponding output tile. If “ALL” is rolled, all candy outputs will have a new candy placed on them. After new candies have been added to the appropriate output tile, the next round begins with the new first player’s player actions.
Game End
The game will continue until one type of candy has been completely sent through the factory with no more available in the supply. Finish all candy movement for the round and proceed to final scoring.
Final Scoring
Each player scores the points listed on any complete orders that they have. Any time there is a tie, all tied conditions are true. These cards will all score.
Players will also score any blanket orders that they achieve.
Simple Game
This can be a way to slowly introduce the complexity of the Sugarworks factory.
| First Shift: This is my first day. | |
| Setup: | Create an order deck using the 1st shift Order cards. Skip creating an order market, deal 3 sales orders to each player and discard the rest. |
| Candies: | Circle, Triangle, and Rectangle |
| Special: | Discard and redraw any tile that calls for excluded shapes. Spawn all three candy at the end of the candy phase. Do not roll the candy die. Skip taking order actions. |
| Second Shift: I think I know what is going on. | |
| Setup: | Normal, Use Only Sales Orders and Create an Order Market. Use the yellow hexagon blanket order gray side up. Do not roll the die to flip this blanket order. |
| Candies: | All |
| Special: | Take order actions normally. New candy will now start on the candy output tile when rolled at the end of the candy movement. |
| Third Shift: I’m ready to be promoted, Boss! | |
| Setup: | Normal |
| Candies: | All |
| Special: | You’re playing the game now! |
Advanced Rules
The following additions can be made to increase complexity as desired.
- For Advanced Play include any of the following and alter the appropriate step above:
- Flip the game board to the “B” side of the board
- Roll the candy die
- Place a random conveyor tile face up on the spaces with icons matching the candy die roll.
- Deal one Sugarworker to each player.
- Players choose the ability on either side of the card to use for this game.
- Shuffle the candy activation tiles. Cover the Bonk! spaces with the shuffled candy activation tiles face up.
- Shuffle the candy output tiles. (This replaces the candy output step above.)
- Randomly arrange them face down in any of the six eligible spots.
- Revel the randomized candy outputs and place one candy on each of these.
- Flip the game board to the “B” side of the board
Alternate Board
Place the board “B” side up. The “B” side has conveyor tiles other than the straight forward tiles and it has candy icons on some of the spaces. Roll the candy die. Place a random conveyor tile from the top of the conveyor deck onto the spaces corresponding to the candy die. It’s best to do this in candy activation order. This variable board is also a good addition to one or 2 player games.
Sugarworkers
Sugarworkers give players a unique ability that can either be used once per game or once each turn. To incorporate Sugarworkers into the game, deal out one Sugarworker card to each player randomly. The player may then choose either side of the card to use for this game. That player now has the ability listed on the Sugarworker card for this game.
Candy Activation Order
Shuffle the candy order activation tiles. In the Bonk! reference on the game board, deal one candy activation order face up to each of the five candy Bonk icons. Candy activation sequence for this game will now follow that order when resolving candy activations.
Candy Output Starting Position
During setup, shuffle the candy output tiles and deal them face down to any of the six valid candy output locations. Once the starting output locations have been selected, turn these tiles face up and place a candy on each of the corresponding spaces.
Scenarios
Scenarios are alternate ways to play from the standard game.
| Cooperative or Solo | |
| Setup | Deal eight order cards face up to be shared between players. |
| Candies: | All |
| Special: | Players score together. For each completed order, score the face value. You will lose points for any orders that are not complete. There will always be a hand limit of 8 orders in the shared player hand. Two players can’t adjust a candy output out of and then back into place. Don’t skip actions. If playing solo, take two sets of player actions before candy movement. |
| Win: | Play for the high score! Write your scores in the rulebook! |
| 9 or fewer | Bitter Start |
| 10-24 | Pleasant Shift |
| 25-49 | Tasty Effort! |
| 50-69 | Sugary Satisfaction! |
| 70 or more | SWEETNESS OVERLOAD! |
| Lucy Mode | |
| Setup: | Normal |
| Candies: | All |
| Special: | Candy spawns in each output every turn. Players may now choose one of the following two actions as a factory action. Eat a Candy Players can also choose to “Eat” a candy on their turn and place it in lost. 5-second Rule Players can “Eat” a candy from “Lost” and remove it from the game. We highly recommend that they also declare “5-second rule!” when they do this. |
| Win: | Score orders as normal and don’t get sick eating all of the candy! |
| Irritating Coworkers | |
| Setup: | Normal. All players must agree to use any rule listed in the Special section below. |
| Candies: | All |
| Special: | In addition to the standard order actions, players may choose to include any of the following irritating order actions: Order Pawning Players have no hand size limit. They can’t choose to draw a card as an order action if they have 6 or more cards. Players may place a card from the market or the top of the deck into another player’s hand. Order Swapping Players may take an order from an opponent while giving the opponent one of their orders. Hidden Orders Players may select an order in any opponent’s hand and turn it to face the other direction. The player holding the order can still score on this card if they remember what it was, or during end game scoring. For special orders, they must specifically state that the event on the indicated card occurred. If they are correct, their opponent truthfully says “yes” and they score the card. If not, their opponent flips another card to face away from them. To reveal their cards again, one of the cards facing away must be used to create a candy. They indicate a card and ask their opponent if this card can create a candy. If it can the opponent truthfully replies “yes”, they discard the order card and create the candy as normal. In addition, they can turn all cards to face them again. If they can’t create a candy, their opponent truthfully says “no” and their opponent flips another card to face away. |
| Win: | Score orders as normally and try to keep your friends. |
| Classic Sugarworks | |
| Setup: | Use Only Sales Orders, Place the yellow hexagon blanket order gray side up next to the game, do not create an order market. |
| Candies: | All |
| Special: | No market actions. For your factory action, you may draw 2 keep 1 sales order. |
| Win: | Score orders as normally |
FAQ
When does a tile “Eat” their favorite candy? As soon as candy comes in contact with the “Eat” tile, the candy is removed before any other interaction. This can happen as candy moves, Bonks, or when a tile is placed underneath it.
Can candy be pushed back onto the candy output Tiles? No. Candy output tiles can only hold candy that has been produced by the candy die. Candy moving onto a candy output tile in any other way is Lost.
How do ties with Fewest and Most work? Sugarworks believes in happy ties. In the event that the same quantity of candy is in a bin for each color represented, they all tie for both fewest and most.
What about Zero? Is zero “fewest” or “most”? No. Only candy that is present counts as “fewest” or “most.” The keyword that will reward candy missing from a location is “No.”
What is the Tile/Bonk/Movement priority? Eating tiles happen immediately, Bonks interrupt movement and must be fully resolved for all candy before finishing the movement of the current candy. Bonk direction overrides the conveyor direction. Normal candy movement follows the conveyor.
When does candy move in the direction of the conveyor? The arrow shows where the next space of normal movement will place the candy.
What if we find an infinite loop? In the rare event that you have created an infinite loop that has been overlooked, stop when the initiating candy tries to move again. The candy blinks out of existence and is placed in the Lost pile.
by
Tags: